Tuesday 30 August 2011

Exercise: Histogram

This is an interesting exercise in exploring the histogram and how it relates to exposure. For this exercise we are to choose three subjects, one with low contrast (flat or no dynamic range with the histogram grouped in one area) an average contrast, and high contrast ( histogram spreading over the entire graph). We are also to take 3 images of each subject at -1,0 and +1 f-stops compensation and note the affects of the histogram and any highlight or shadow clipping warnings.

I actually learnt quite a bit here as some of my subjects were not as contrasting as I thought they would be and visa versa, I may be confusing contrast and how this is displayed on the histogram.

I have always used the histogram on the camera for checking images, the ideal always being a good contrast with pixels from far left to right without clipping. In photoshop I also use it with 'levels' to increase or broaden the pixels to the left or right by moving in the sliders. This boosts the pixels in these areas.

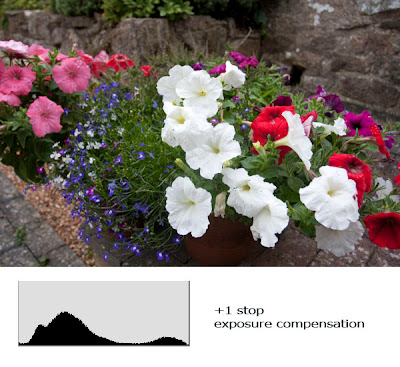
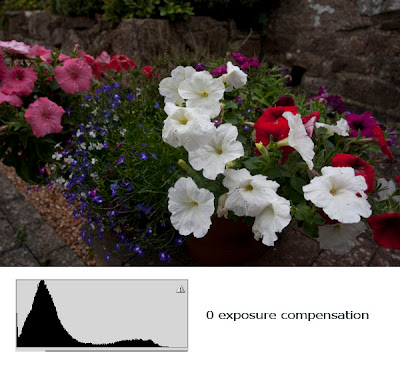
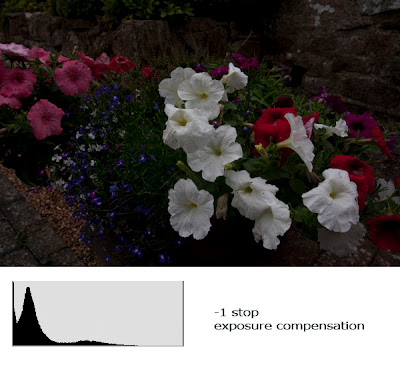
The first set of images I thought would be higher contrasts as they have white flowers, however the histogram shows that the majority of pixels are in the shadows, perhaps this is where the camera is compensating for a high contrast image. In both the 0 and -1 exposures the shadow clipping warnings were displayed as also seen by the big spike on the left of the histogram. Increasing the compensation to +1 removed this but added a highlight warning, however this has led to a more distributed histogram although lacking in the 'middle'.

The next set of images I thought would initially be flatter, but they are actually average contrasting. In this set the shadow warnings did not appear, though in the +1 exposure a slight highlight clipping was shown, this can also be seen in the histogram as an overexposed image. Again the shift in the histogram can be seen from left to right with greater exposure. In this set the zero exposure has the best histogram more centrally distributed.


The final set of high contrasting images are of an office block with lots of black and white making the most contrasting image I could find. These images were taken on a sunny day and this has led to the shadows being less intense, however this does make for some interesting histograms.

I also left the ISO at 1000 by mistake, this has led to grainier images that expected.

In this set I actually prefer the contrasts of the -1 f-stop exposure. It also has the highest dynamic range and the only one to show both shadow and highlight clipping. The middle image is fine but the +1 exposure was too overexposed with a lot of highlight clipping warnings, all to the left of the image and little or no shadow. all 3 histograms are very 'spiky' could this be caused by the midday sun and the high contrasting subject?


Tuesday 23 August 2011

Exercise: Your own workflow 2

This exercise is similar to the previous exercise though the subject matter is unstructured and open in terms of time generating an unpredictable number of images. This leads to a slightly different workflow, especially in the selection process. I chose street photography on a visit to London, the number of images taken was around 60 but these were reduced on the day by deleting poor images using the camera's preview window. This is itself is a variation to the previous workflow....
The workflow consisted of:

Planning: Capture classic street images of London, visit Convent garden, capture street performers, crowds, people in situations.....

Preparation: batteries charged, memory cards wiped, selected wide angle lens with polarising filter. Flash batteries checked.

Shooting: check images and re-shoot or delete as appropriate. Checking done on tube etc. Looking for over-exposed, under exposed, blurred images.

Download images to negatives directory under a subdirectory of 'Your own workflow 2'

Made selection of 'selects' and then chose the best from these., after having a break and reviewing.

Finally edited final selects for colour, contrast and sharpness. Saved to JPEGS and uploaded to blog.

Conclusions:

This is subtlety different to the first exercise. I found that the workflow varies in the time allowed to refine images on the job, this leads to a lower number making the processing stage quicker. The choice of subject also leads to images that you had no idea you would capture, this in turns makes the selection process longer as there will be more varied images compared to that of the firs workflow where there may be many images of the same subject. Planning and processing did not vary much if any thing at all.

I am not sure if it is relevant but I also find choosing the final selects harder!!!!


Wednesday 17 August 2011

Exercise1: Your own workflow 1


In this exercise we are tasked with devising our own workflow for a specific short assignment. It is suggested using a portrait session which is limited in time. I however had an opportunity of taking some images at a small local festival, and I would only be there for one pint so time in this case was certainly limited.

From these time limited images we are to select a final two encompassing our entire workflow.

Digital workflow is not new to me and I took on a lot of advise a while ago from a digital camera magazine on this very topic, though this was more concerned with organization of files it did include many aspects of workflow.

For this exercise the workflow devised was:

Preparation:

Batteries charged, flash cards cleared of old images, use of mid range zoom lens, camera set to 100 ISO and auto white balance.

Images to capture the essence of a small music festival, people, tents, music, dance, colour etc.

Shooting images

Processing

Upload images to PC in raw format (note the directory I use automatically syncs a backup copy to another disk for security). I used the Adobe Bridge utility to automatically rename the images to the event and store them in a directory called ‘digital negatives>oca>dpp>part one>festival’, keeping the files in an ordered place helps me find them in the future.

Use Adobe RAW converter to weed out poor images, or out of focus, blurred etc., mark these as UNSELECTED. These will be deleted later from the hard disk.

Select all possibles, and mark the ones I like as RED, potentials as YELLOW, noting that these may look OK if cropped or converted to grayscale.


Process the final two images, this may include cropping, curves, colour [ the camera makes no adjustments], save as JPEG.

Further crop image to a smaller size suitable for the blog and upload.

I found that this workflow works well for me, although I didn’t capture as many images on the day I would have liked the overall process has helped me to think about preparation and improving workflow to help be more efficient in getting results. I also need to devise a plan to archive off the images that are not suitable, perhaps just to a DVD and leave only the Green images on the disk, with the amber archived and the reds deleted entirely. My hard disk is getting full……

The final approved two images, showing movement, people and colour....